July 31, 2013

Happy Window-versary

Yesterday was the two-year wedding anniversary for me and my husband.  After officially moving into our new house this weekend, we didn't have any steam to do anything particularly nice for one another.  In reality, we've been together for over a decade so it's rare we feel like doing anything nice for each other anyway.
As fate would have it, we got a present we could both enjoy--new windows to replace our entire downstairs!  It's moments like these I think to myself, "Wow, I must be old if windows excite me this much."  Let me explain...
When we first looked at this house we knew the windows would be an issue.  They were original to the house and according to the glass company, pretty much the worst quality you can get.  They were never made to last more than 12 years...which put their lifespan at 1998.  By 2013 they were long overdue.
 Front windows that overlook the porch transformed!
Almost all the windows in our house were marked as "failed." One of the main issues with failed windows is that they actually get dirt and condensation in between the panels so no amount of cleaning takes away the foggy look.  Our back bay window was so bad we couldn't see the backyard.
 Hard to believe this is the same view.  What a difference!
During final negotiations we received enough money from the seller to replace the downstairs windows (3K) and only had to put in $25.00 of our own cash.  So, it really was like getting a present.

To prep for the new windows we first sanded, primed, and painted the trim around them white (Valspar Ultra semi-gloss white, same as our other trim.)

Eat-in area on day one:
 Eat-in with valance removed and trim painted white:
 Eat-in with new windows!
The old windows also had busted wooden grids.  We now have no grids in the back bay window, but for the front I felt it would look too "unfinished" without anything so the glass company convinced me to go with prairie-style grids and I love them, especially in the large picture window which is part of the front bay window in our dining room.
 The picture window in the dining room went from 16 squares to pretty prairie grids and looks so open.
I still need to do some touch-ups to the paint, but the difference to the windows is astounding.  We can actually see out of them!  Eventually we'd like to replace all the upstairs windows too.  Maybe our third anniversary.
Dining room on day one:
Dining room with white trim:
Dining room with new windows!

July 23, 2013

Blue Bedroom

The master bedroom is feeling blue.  We really wanted to go with some kind of green in here, but every shade just seemed too overwhelming for such a large, rectangular space.
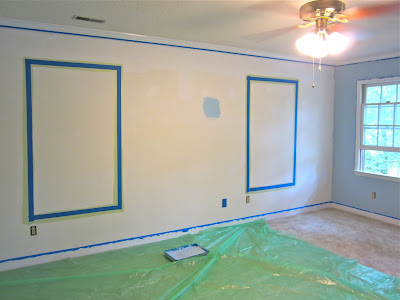
(Master bedroom before and after paint.)
If you are wondering about those green squares on the wall, those are our very elaborate stenciled panels. You know how some people are able to pull off intricate patterns on walls--like Moroccan-style or hexagons?  Well, we can barely make a straight square, so that is where we drew the line, literally.

We created them by doing a cursory measuring job, penciled the lines, then painted a thick square around the lines, which was then covered with wide painter's tape.


We chose Valspar Signature (Eddie Bauer Home Collection) Oxford Blue for the walls, and the green border/stencil color is Dill by Valspar.  I wasn't sure the tape would hold up after three coats of paint on top, but it survived!

I'm anxious to see what it looks like with the furniture in here. The idea is that these painted "panels" will help break up that long wall. Our gray bed will be in the middle and end tables "within" them. 
We didn't even repaint the trim in here and look how much it stands out without the border and with some paint on the walls.  Curtains or blinds are next on the list.

July 21, 2013

Bye, Bye Border

When our house was built in 1986, someone thought this floral border in the master bedroom was real pretty.  It just doesn't have the same appeal today.
Taking down wallpaper isn't fun or and it isn't easy, but we're learning that no house project really is.  The steamer worked well getting down the initial layer, but it still left a lot of adhesive residue behind.  We scraped over this area with a wallpaper scraper, sanded it, then added a coat of primer.  This gave enough of a smooth surface so that when we started to paint color on the wall, it blended as if that floral masterpiece was never there at all.
I didn't even realize how much the border darkened the room.  We're in the process of finishing the paint job in there now and it looks entirely different.  More on that soon!
(Before and After Border)

July 17, 2013

Warming up with Orange

Behold our first finished wall, and yes, it's orange!
Committing to color is scary.  I know it's just paint, and we can always change it, but after the amount of time it takes to apply it, I don't want to think about redoing it any time soon.
I read that in dark rooms it is good to go with warm colors like the sunset.  We chose Olympic ICON paint and primer.  The color is Field Poppy with a satin finish (three coats).
Our fireplace is a great focal point, but the stones are massive and are a little overwhelming for the space.  The grout is also very dark.  Painting the wall orange helps draw attention away from the downsides of the fireplace and pulls out the "prettier" sand and rust colored stones.  Someday, we think we'd like to box in the top of the fireplace and add low built-ins along both sides, giving it a more craftsman-like feel.

Painting the trim white helps brighten up the space and detracts from the popcorn ceilings.  The oak trim is a killer though--it involves sanding, sponging, priming, sanding, sponging, and at least two coats of Valspar's Ultra paint + primer semi-gloss white.

Here, you can see the difference between the old and the new wall.  With some color in here it's starting to look less like an insane asylum, but with three more walls to paint and the entire rest of the house, it's very likely that's where we'll end up.

July 15, 2013

Down with the Doors

Our house has an abundance of interior doors.  My first thought was to remove almost all of them to keep the figure-eight style flow of the house completely open, but on second thought, I decided to remove only two and to keep the others in place to see if they prove useful for noise blocking and heat savings down the road.
(Dining Room)

The doors I did take off included one that closed off one side of the dining room (I just couldn't see a need for closing that door), and one for a small cubby closet in the side entrance, which if opened at the same time creates a barricade.  We plan to turn the closet into a fun, open "mudroom cubby"...more on that later.
(Side Door with Cubby)
Taking the doors off the bolts with a screwdriver was a sinch even though they were heavy oak.  Since the doors were in great condition, I listed them on Craigslist and made a small profit of $40.  Not too shabby for doors I didn't want in the first place.
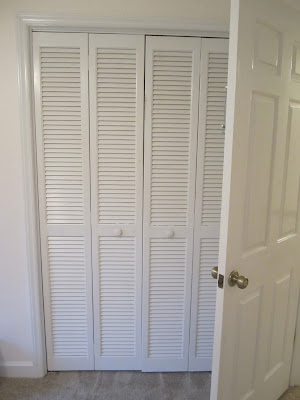
While I was at it, I removed the rickety bi-fold doors from two closests upstairs.  One kept colliding with the door to get in the room, and the other was just loud.
Once you pop out the top roller, it's pretty easy to screw off the rest of the track and rip these bad boys down.  Don't let my giant arm muscles intimidate you, ha.  Of course the track line in the closet needs to be repainted.  

(3rd bedroom small closet)
(Guest room with slightly bigger closet)

My plan is to cover the small closet with a curtain and just paint the inside of the big one for guests to use as a closet/cubby...or a squatting cave.

July 11, 2013

Curtain Call

After we were handed the keys to our new place, I wanted to go over and eat dinner on the floor.  Even though the place has new carpets, the thought of it freaked Tommie out, so instead we went over and ripped down all the old, ugly, and heavy curtains and valances.  It was satisfying enough, though I was still hungry.
(Living room)
Two minutes into our very first house project, Tommie was sweating and swearing up a storm as he wrestled to get down these 8-foot long wooden beasts and all the hardware that was jerry-rigged to the walls with crazy bolts.  
(Upstairs Guest Bathroom)
But in the end, it felt great to purge those hundred pound, dust-traps from the previous owners and let in the light!