Showing posts with label Master Bedroom. Show all posts

May 25, 2014

House Love At First Sight


It was on Memorial Day weekend last year that we saw this house listed for sale on Trulia. It was in a nearby neighborhood we had been "stalking," it was within our price range, it had all our "must-haves," and it had just the right amount of potential. Our Realtor showed it to us later that afternoon. We put in an offer the next day and found out the offer was accepted the day after that. We went from casually browsing to buying a house practically overnight.

We've done a lot of work so far and we have a lot more to go, but I often get so caught up in the urge to fix everything all at once that I forget to take the time to reflect on everything we've accomplished in one short year. It's hardly the same house anymore…and that's a good thing, I think.

Here's a montage of the house as it was listed one year ago and how it stands today.

Exterior changes: Powerwash, new paint (blue, gray, & white), new white steel door, new white vinyl windows downstairs (new windows upstairs coming soon!)
One Year Later
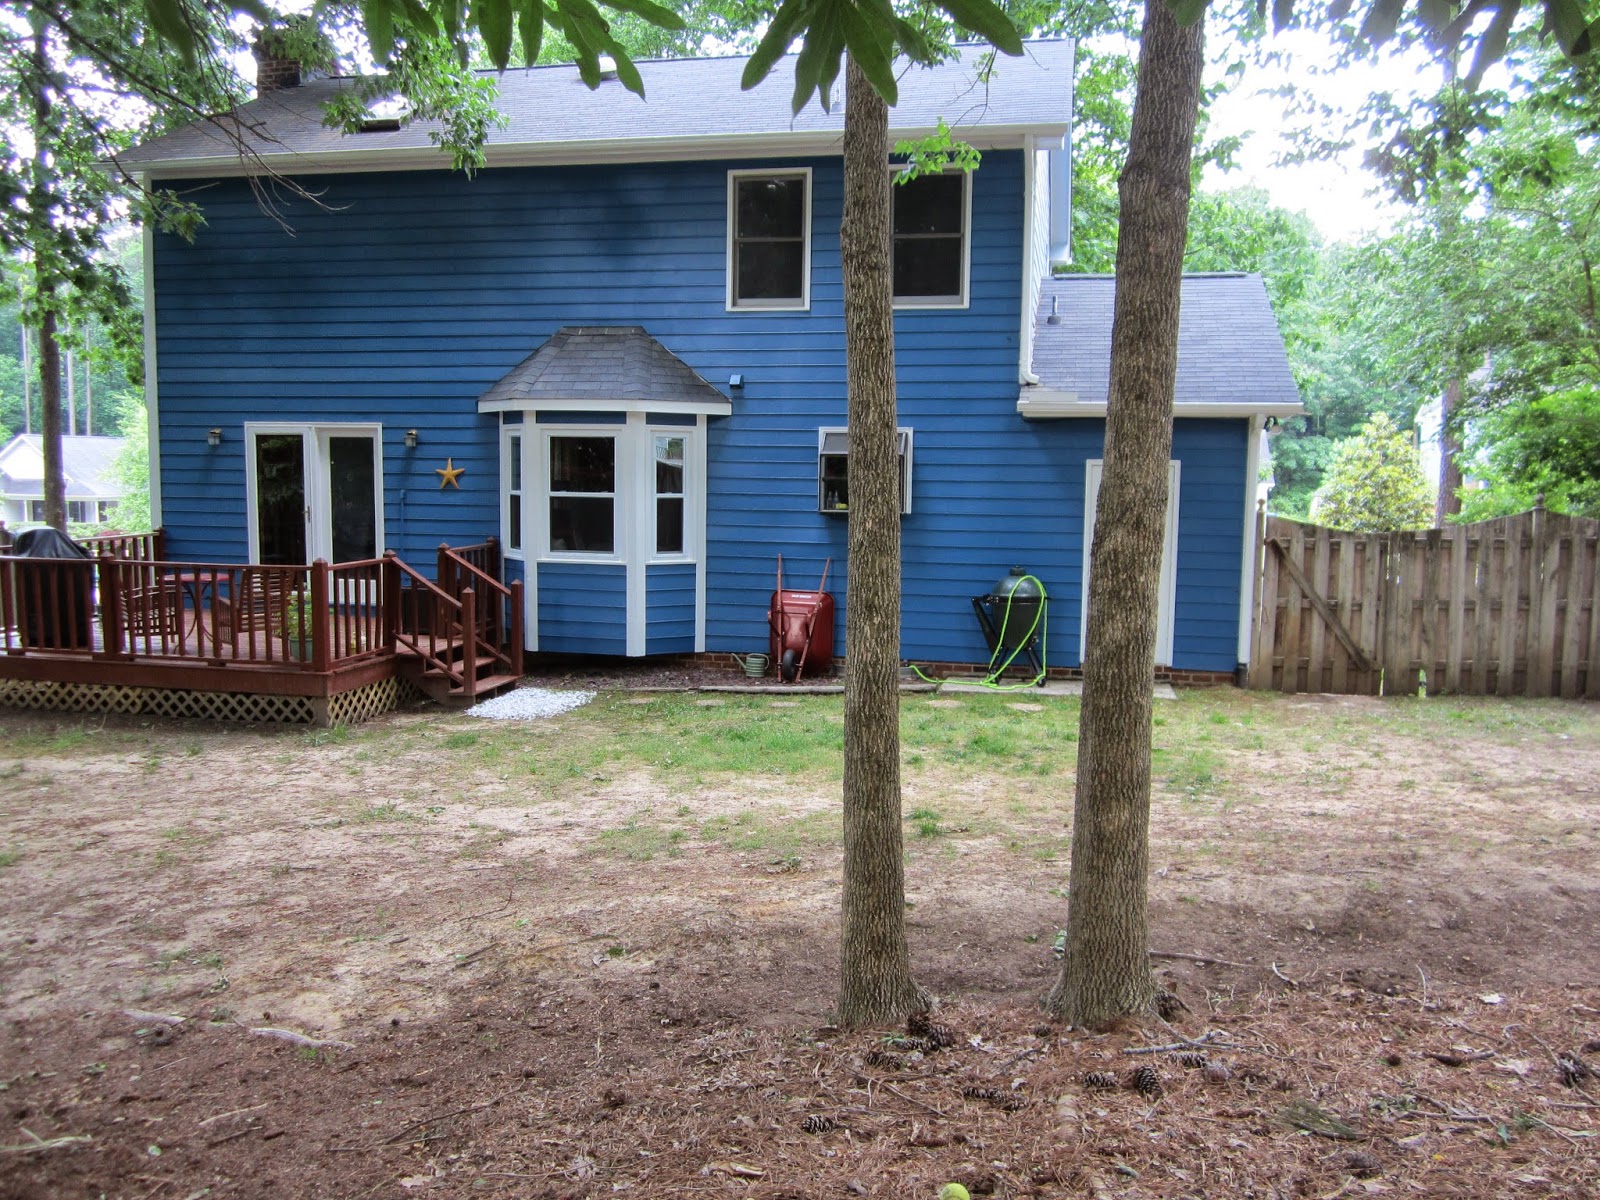
Backyard: Powerwash & new paint, new bay windows, cleared out monkey grass, vines and small trees, repaired broken lattice and play set.
One Year Later

One Year Later
Living Room: Painted walls, trim & mantel, new windows, new curtains, new pot lights, stainless steel outlet plates.
One Year Later

Dining Room: New paint, new windows, curtains and rod, new light fixture, table and chairs.
One Year Later
Kitchen: New windows, custom window seat, new light fixture, primed for paint (next week!) 
One Year Later
Front Hallway: New paint & trim (including banister), new white steel door, new light fixture.
One Year Later
Laundry Room: Painted wall and cabinets, knew knobs, new dryer, custom built folding shelf.
One Year Later
Guest Room: New paint, curtains, art, etc.
One Year Later

Master Bedroom: Removed border, new paint, white outlet covers, curtains (new windows coming soon).
One Year Later
A lot of people think we're joking when we say it will be years before we're done fixing up the house, but it's true.  For every project we've finished, there is an equally daunting project we still have to accomplish (the kitchen, bathrooms, third bedroom, landscaping, etc.). Let's blame HGTV for making us feel as though we can "makeover" an entire house in a short hour-long "episode." Today, though, I will remember this house as it was one year ago when we first saw it, and how far it's come.

September 6, 2013

Curtain Call: Act II

After being majorly underwhelmed by all the curtains at the chain stores, I turned to Etsy to see if I could find a shop that made curtains with more modern and interesting fabrics.  There is, of course, a price difference for going directly to the maker, but I don't feel so bad because I know it's going to a person, not a corporation.
(View from the foyer to the new and improved living room.)

The curtains we put up in our bedroom were a compromise from Kohl's.  They are kind of a champagne color with shiny leaf patterns running up the bottom.  
But for the living room, we wanted something cool and original.  That's when I discovered this pattern on an Etsy shop called Ella Seeh.  It happens to go exactly with the orange and gray we are painting the opposing walls (more on our new gray walls soon).  It was meant to be.
I ordered them a tad small to save money which is my only regret.  There is some slight gap-age going on the very sides when they close, but otherwise, they look great and the high quality material is light yet durable.

Lets not forget the thick drapes and 100 pound valance we started with:
Valances have got to be some of the ugliest things on the market, so knowing that we needed one for privacy in our upstairs bathroom, I picked a fabric I liked from the same Etsy shop and ordered a custom size valance with this modern flower fabric.  What I like most about it is that it provides the privacy we need but it's still light enough to let the morning sunlight through.

Pictured below is the original curtain made of 90% dust and 10% lace, equaling zero privacy.

August 16, 2013

Home and Body Repairs

I'll be taking a brief hiatus from house projects to recover from hernia repair surgery on my left and right side.  Luckily, it wasn't the move to the new house that gave me this trouble--it's a pain I've been coping with for a year until finally being diagnosed and cleared for surgery.  Hopefully I'll feel better and be able to take on more tasks once I've had time to heal.

In the meantime, here's an update on some of our spaces since moving in...

LIVING ROOM
Done:
Painted two opposing orange accent walls.
Painted half the trim white.
Wet/Cleaned the fireplace stones.
Replaced beige outlets with steel plate covers.
New windows installed.

To Do:
Hang art.
Paint the opposing walls grey.
Finish painting the trim white.
Get sofa with chaise delivered.
Hang curtains.
Get a new fan/add light.
Replace the doors...eventually.
Box-in fireplace, create built-ins, and craftsman windows...eventually.

MASTER BEDROOM
Done: 
Removed wallpaper border.
Hang curtains.
Painted room.
Replaced beige outlets with white covers.

To Do:
Hang art.
Look for furniture (dressers, nightstands, a TV perhaps) that better fit the space.
Create seating area by windows?
Get a new fan/light.
Replace windows...eventually.

EAT-IN KITCHEN
Done: 
Removed valances.
Painted the trim white.
New windows installed.

To Do:
Update light fixture.
Finish painting the trim white.
Figure out how to paint over painted wallpaper.

SECOND BATHROOM
Done: 
Removed old curtains.
Removed some cabinet doors for open shelving.
Removed bronze soap, towel, and toilet rods.
New shower curtain.

To Do:
Paint vanity and cabinet and replace knobs.
Update faucets.
Update light fixture and mirror.
Replace window.
Install new shower rod and towel hooks.

July 23, 2013

Blue Bedroom

The master bedroom is feeling blue.  We really wanted to go with some kind of green in here, but every shade just seemed too overwhelming for such a large, rectangular space.
(Master bedroom before and after paint.)
If you are wondering about those green squares on the wall, those are our very elaborate stenciled panels. You know how some people are able to pull off intricate patterns on walls--like Moroccan-style or hexagons?  Well, we can barely make a straight square, so that is where we drew the line, literally.

We created them by doing a cursory measuring job, penciled the lines, then painted a thick square around the lines, which was then covered with wide painter's tape.


We chose Valspar Signature (Eddie Bauer Home Collection) Oxford Blue for the walls, and the green border/stencil color is Dill by Valspar.  I wasn't sure the tape would hold up after three coats of paint on top, but it survived!

I'm anxious to see what it looks like with the furniture in here. The idea is that these painted "panels" will help break up that long wall. Our gray bed will be in the middle and end tables "within" them. 
We didn't even repaint the trim in here and look how much it stands out without the border and with some paint on the walls.  Curtains or blinds are next on the list.

July 21, 2013

Bye, Bye Border

When our house was built in 1986, someone thought this floral border in the master bedroom was real pretty.  It just doesn't have the same appeal today.
Taking down wallpaper isn't fun or and it isn't easy, but we're learning that no house project really is.  The steamer worked well getting down the initial layer, but it still left a lot of adhesive residue behind.  We scraped over this area with a wallpaper scraper, sanded it, then added a coat of primer.  This gave enough of a smooth surface so that when we started to paint color on the wall, it blended as if that floral masterpiece was never there at all.
I didn't even realize how much the border darkened the room.  We're in the process of finishing the paint job in there now and it looks entirely different.  More on that soon!
(Before and After Border)